
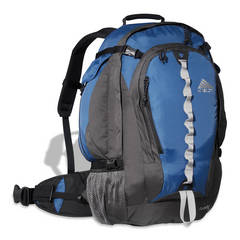
Since my 2005 entry a lot has changed. I replaced the Mountainsmith Ghost with a Kelty Redwing 3100 about a year ago and am really happy with it. It's a standard backpacking bag that doesn't cost much (about $87 at Amazon as of today). It's a well built front loading bag. It meets U.S. airline carry-on baggage restrictions for size. The LowePro was slightly oversized for that, but I never was asked to check it in. The Redwing is comfortable to carry moderate distances, having a decent harness system, but not as good as the Mountainsmith harness. I use Gnass lens cases to keep all the lenses from sloshing around too much. Other small items are kept in a couple of small generic cases: either an old digicam bag with a couple of small compartments or ditty bags. There's also the hard-shell CD holder for all the gel filters. I wrap the dark cloth around the camera to protect the ground glass add use the gg protector only during air travel. There are a couple of pockets on the front of the Redwing that are good for film (Tmax readyloads and my case), meter, lens cloths, etc. There are also water bottle holders on the sides and side pockets as well, but I don't use the latter except to keep a trash bag or two to lay on the ground/sand/snow when needed. It wouldn't be too hard to rig up a way to attach your tripod to the back of the Redwing using the provided loops. The weight of the bag is good, though its not an ultra-light bag. It has an internal hydration reservoir sleeve and tubing exit hole at the top, but I haven't used it--I am a bit concerned about the camera digging a hole in the water bag and causing a leak. The water bottle side pockets work fine for the distances I travel with the Redwing.
Specifications (from Kelty's web site):
Size: 3100 cu. in.Torso Fit Range: 18.5 - 21" / 47 - 53 cm
Usage: Trail
Suspension: Internal
Specifications:
Volume: 3100 in3 / 50.81 liters
Weight: 3 lb. 6 oz. / 1.5 kg
Dimensions (outside):
Length: 25.5" / 65 cm
Width: 16" / 41 cm
Height: 14 / 36 cm
Materials:
Body Fabric: 420D nylon micro ripstop
Reinforcement Fabric: 600D polyester kodra and 500D nylon kodra
Packbag Features:
- Front-panel loading
- Zippered side pockets
- Large front pocket with organization
- Security pocket
- Daisy chain
- Lash tabs
- Zippered stash pocket
- Side compression straps
- Fleece-lined optics pocket
- Mesh water-bottle pockets
- Ice-axe loop
- Hydration-compatible
- Reservoir sleeve
- Single LightBeam™ aluminum stay
- Breathable Airmesh waistbelt
- Removable, stowable waistbelt
- Belt stabilizers
- Scherer Cinch™ (US Pat #5,465,886)
- Padded backpanel
- Padded shoulder straps
- Breathable backpanel and shoulder straps
- Sternum strap
- Removable, stowable waistbelt
2005 Update
Last February I found Campmor had a sale on Mountainsmith Ghost packs so I bought one to see how it would work out for an LF bag. I have admired the comfort of their harnesses since buying an Auspex for backpacking several years ago. Since the pack has no interior dividers, I got two Gnass Gear padded lens cases and a couple of ditty bags for the small stuff. I wrap the folded Arca Swiss in the dark cloth with the ground glass protector on. This arrangement works well for backpacking and car photography. I don't think I'd use it for air travel--its probably too big for that anyway. I'll keep using the LowePro for that. The harness on the Ghost is every bit as comfortable as I expected and it carries very well. I put the two lens cases at the botoom of the pack, then the folded 4x5, then accessories: Gnass readyload holder, ditty bags and filter case.
I've been looking at a number of standard backpacks to replace the LowePro Pro Trekker AW. I went on a short 2-mile hike with the Lowe bag last weekend and was miserable at the end of the trail. I'm also very annoyed with its very stiff waist belt that sticks out if you don't feel like buckling it. It's also very heavy! Can't recommend that bag except for short treks.
So, I'm on a search for the ideal backpack that can carry the A-S field and perhaps just enough other gear for a 1-2 night trek. I figure something around 4,000 in 3 would be about the right size (the LowePro Pro Trekker is about 1600 in3 , for comparison). Preliminary results are: 1) Granite Gear Nimbus Access FZ 3800, 2) Gregory Forester or 3) Gregory Reality. Those all have some kind of front access to the inside. The problem with any general-purpose backpack, though, is keeping all the gear secured. I'll have to sew some webbing or something into it to keep everything organized.
I'm partial to the Nimbus Access packs by Granite Gear. The advantages of the Nimbus:
- Has a large opening for access through the front. This is pretty much essential in a camera pack.
- Has a tough frame sheet that covers the entire width of the pack, which would prevent being gouged in the back by protruding equipment. The Gregory Reality would be OK except for its narrow frame sheet, although if you insert some closed-cell foam, that's less of an issue.
- Two overlapping sets of cinch straps. This can help hold everything in place, but the straps aren't very long, so it can't be cinched down too much if the pack is under-loaded.
- A comfortable harness. I only had it on at the store, so I'm not totally sure about this point. It felt pretty good & the pack was stable with my camera gear plus some extra weights in it.
Some disadvantages:
- Expensive at $250, but a good deal cheaper than the LowePro.
- Will have to be retrofitted with padding or sewn in webbing to strap the gear down.
There is also a backpack survey on Q.-Tuan Luong's LF Home Page and on the Large Format Forum, there is a section covering taveling with equipment.
One bit of potentially good news: Mountainsmith has confirmed a rumor (heard 2nd hand here) that they are going to be introducing photo backpacks starting this summer! They make excellent mountaineering packs, so it will be very interesting to see what they come up with.
Here are some photos of my Lowe Pro bag packed up:
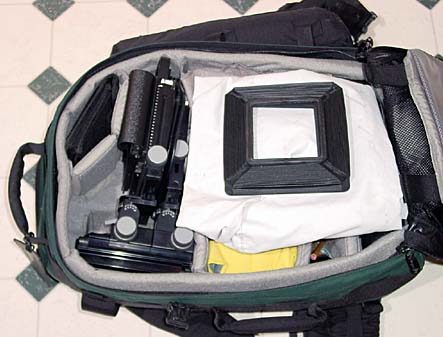
With the BTZS focusing cloth folded and 50cm bellows on top.
The camera is packed on it's side, and it does fit that way, but only just.
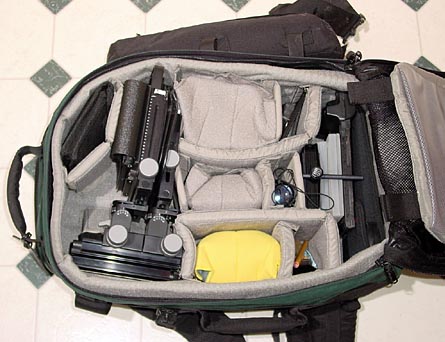
Shows how I arrange mine. The camera is packed so it's on top, so weight is distributed better. It's an old backpacking rule that heavy stuff should be higher on your back, not on the bottom of the pack. The lenses are, from top to bottom, the 72mm SA-XL, 110mm SS-XL, 210mm Sironar-S. The pouch attached to the side of the pack (top of photo) holds two more lenses. It has to come off for air travel as check-in luggage—not a big deal.
Having recently flown with my LF gear a few times, I have come to the following conclusions about how to fly with your LF gear and have fewer problems:
-
Get a decent tripod case, preferably hard-sided. See this thread on the LF Forum that has some good ideas about this:
http://www.largeformatphotography.info/forum/showthread.php?t=8355. I have the Tanba TTP 34, which works well and has a bit of extra room for stuffing clothing odds and ends into. -
The LowePro bag (see above) is good for flying, being the absolute max that can be carried on domestic flights. It might even survive being checked, but I would take anything fragile, e.g. lenses & ground glass holder, out before doing that. This bag just barely fits the full sized overhead compartments of full sized airplanes (727, etc), but will not fit in smaller aircraft--in that case have the airline people check it for you.
-
Be sure to go all the way through the TSA's list of prohibited items(PDF) to be sure you aren't going to loose something at a security checkpoint that you might need on your trip. Tools are forbidden on carry-on, which isn't widely known, but I lost one of those little Gitzo wrenches and almost lost a Rodenstock lens spanner wrench the last flight—inexpensive items, yes, but I'd hate to have to replace them if I needed them in a hurry. The list shows what's permitted in both carry-on and checked baggage.
-
If you take film with you, carry unopened boxes (assuming you are carrying regular sheet film and not ready- or quickloads). Security will open them if they are not factory sealed—even if you don't have a changing bag. I've heard that they will let you use a changing bag for inspection, but I wouldn't want to go through that in a security line. If possible it might be best to just buy film at your destination, have it drop shipped by your supplier, or ship it ahead yourself. Most hotels and workshops will let you ship stuff ahead of time, but warn them in advance, obviously.
For those who don't do much biking, this may seem odd, but it is quite workable with the proper gear. With all the bike paths around in natural areas, biking will take you to locations that you might otherwise not be inclined visit. It's handy in urban areas, too, where parking can be difficult. It's also just plain fun to do! The jury's still out on whether I'll find any better photo opportunities than I would otherwise.
The big caveat about doing this is to be sure not to overload your bike. Most bike manufacturers publish maximum weight loads, so it should be fairly easy to figure how much gear you can carry. I'm using my mountain bike, a Gary Fisher Utopia I bought back in '97 or '98. A mountain bike is probably the most sensible type to use, since some (maybe most) trails won't be paved & the balloon tires tend to absorb some road shocks. My bike doesn't have front shocks, but it probably wouldn't hurt to have them.
You'll need:
- A heavy-duty bike rack.
- 1 pair of rear panniers.
- bungee cords for the tripod.
Take you camera gear & go to your favorite bike store & ask a knowledgeable sales person for a bike rack and panniers to hold your camera stuff. I usually just bungee the tripod to the top of the rack, but add some padding to prevent abrasion of your tripod's finish.
Get panniers that will make it easy to get to your photo gear easily. They should be farily easy to mount and unmount on the bike. Make sure they are sturdily sewn together & made of durable fabric (like cordura), since they will be holding a fair amount of weight. Unless you're a minimalist, you'll probably need a pair of paniers.
Some examples:
- Cannondale Overland
- Arkel T-42
- Ortlieb Tour Box (a hard case)
Not that I'm specifically recommending any of these, since I haven't personally evaluated any of them, they're just some examples of the type I would prefer. Your mileage may vary.
Site contents are
Photographs licensed under a
Creative Commons Attribution-NonCommercial-ShareAlike 4.0 International License.

All trademarks and logos belong
to their respective owners.
Page last modified:
23-Jan-2018